Photographing animals has always been an area of photography
that I have wanted to explore, so recently I set out with my camera with the
intention of capturing portraits of animals. Not only did I develop my
knowledge within this area of photography whilst conducting this project, I
managed to produce some impressive portraits of animals which you can see in
this post. I have also included a section within this post titled, `Top Tips for Photographing Animals`.
To take my photographs, I went to my local zoo called `Drusillas
Park`. This zoo has a diverse range of animals with lots of different enclosure
settings, allowing me to produce a good variety of photographs. Although the
zoo was extremely busy, because the weather was sunny, which doesn’t happen
often in England, I was still able to take some good photographs.
For all of the photographs included within this post, I used
my Canon EOS 500D DSLR camera, with my Canon EF 70-300mm f/4-5.6 IS USM lens.
This lens was my most important piece of kit when I went out on my shoot, as it
allowed me to zoom right into the subject, so that they would fill the frame,
resulting in a really focused shot. The USM (Ultra Sonic Motor) featured in
this lens, helped me a lot when I was taking my photographs, as it
enabled me to keep my subjects in focus, as it would adjust the focus accordingly,
whenever the subjects moved.
Here are three of the images that I produced for my animal photography project:
Click on the images to enlarge them.
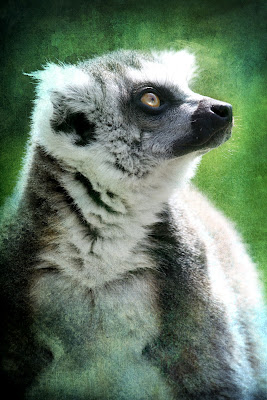 |
| `Wondering...` - Douglas Benge |
I have titled this photograph,
`Wondering…`, as this is what the lemur appears to be doing in the image,
thinking and wondering. I took quite a few photographs of the lemurs when I
went on my shoot, but this photograph was the one that had the most natural
character within it. I really like the composition of this shot, as the lemur
looks into the empty space at the top right hand corner of the image, which in
turn is thinking space for the viewer. I
added two textures to this photograph, to try and create a texturally rich
image; I think I have succeeded, as this photograph of a lemur is full of
colour tone and rich textures.
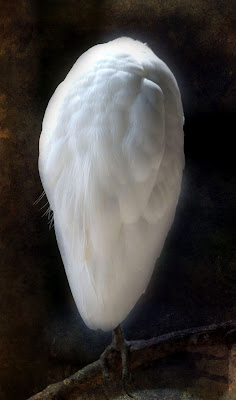 |
| `Unknown` - Douglas Benge |
I have titled this photograph,
`Unknown`, as it depicts a bird perching on a branch, but you can’t tell what
type of bird it is, as I have photographed it from behind whilst its head was
tucked down into its chest. I really like this element of mystery that this
photograph has, as it draws you into the image, as you try and work out what
this `creature` is. I have used a dark texture on this image, to create the illusion
that it is night time. After I placed this texture onto the image, I erased the
area of the texture that could be seen over the bird, resulting in the image
that you see before you, where the bird appears as if it is glowing. The abstractness
of this photograph helps to create a more powerful image, that isn’t just another
standard animal portrait.
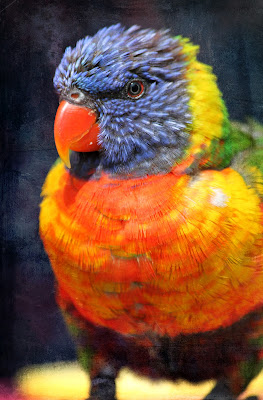 |
| `Rainbow Lorikeet` - Douglas Benge |
I
have titled this photograph, `Rainbow Lorikeet`, as this is what the image
depicts. The natural colours within this photograph are beautiful and vibrant,
which is why I chose to use a multi-coloured texture over the original
photograph, to add to these rich colours, and to create a photograph with more
tone. I really like how the lorikeet is looking directly into the camera lens
in this image; it adds an element of interaction to the photograph, as we are
able to look at him directly in the eye. When I was photographing this lorikeet,
because of its small size and the fact that it kept moving, it was difficult to
keep focus on this birds face, but with some patience, I managed to produce this
shot where the lorikeets face is in focus.
I was inspired by the
photographer, Pauline Fowler, to produce my animal portraits in the way that I
have. Pauline has produced a photographic series titled, `Exotic Animals`, which features
photographs of animals such as zebras, tigers, and monkeys, that have all been
manipulated in Photoshop, to create really rich textured images. To create
this effect for her photographs, Pauline uses layered textures; these textures
include her own photographs taken of light on water, greenery, skies, and some
free textures that she downloads from the internet. I highly recommend
that you visit her website and take a look at her `Exotic Animals` series. Here
is the link: http://paulinefowler.artspan.com/
Top Tips for Photographing
Animals:
- Be patient! – Patience is probably the most important thing you can have when photographing animals. You need to remember that animals are their own beings, so they aren’t going to do exactly what you want them to do. In order to produce natural animal photographs, you need to be patient, and need to wait for that natural spontaneous moment, it will be worth it.
- Experiment with different angles – The size of an animal will affect the angle that you photograph it from, so be prepared to get on the ground in order to get that perfect shot, especially when photographing small animals like pets. Photographing your subject from the best angle, can turn an ordinary photograph into a really impressive image.
- Photograph
your subject early or late in the day – Photographing animals in strong midday
sun isn’t ideal, and animals are generally less active at midday if the weather
is warm. So, you should get up early or wait until later in the evening, in order
to photograph your subject in the `golden hour`, the first and last hour of
sunlight in the day. This will allow you to produce images that have a beautiful
warmth to them, and will also allow you to take some stunning back-lit photographs.
- Focus
on your subject’s eyes – Having a sharp focus on the eyes of a subject is
important in any kind of portrait photography; this same principle applies when photographing animals. Different animals will have different shaped and coloured eyes, so a
sharp focus on these eyes will allow you to see them in great detail.
Remember, “Eyes are the window to the soul”.
- Try to avoid using flash – If
you were to use flash when photographing an animal close to you, their eyes in the photograph would be an undesirable bright green colour; use natural light to photograph
your subject, as this will create a softer photograph that has better tonal qualities
than an image where your subject has glaring highlights from the use of flash.
If you are at a zoo, and are photographing animals though a glass screen, you
should definitely not use flash, as the flash will reflect off the glass, resulting
in a bright, glaring image.
I hope that these tips will help you when you go out to take your own animal photographs.


.JPG)


