A live concert is quite a tricky situation to photograph, as
there are many different factors to consider when you are trying to get that
perfect shot. In this blog post, I am going to discuss what camera equipment and
settings you will need to help you capture that magic moment. I will also include
some of my own concert photography work, which will hopefully inspire you when
you begin your own concert photography adventures!
I've been lucky enough to photograph some very well-known
bands as a photographer, such as the alternative rock band, `Keane`, when they
performed at the `Hastings Beer & Music Festival` (HBMF) in 2012. More recently I
worked as a photographer photographing the post-hardcore band, `The Blackout`,
when they played at `The Old Fire Station` in Bournemouth. I've also been able
to photograph some great local bands too, such as `Ska’d 4 Life`, who also performed
at the `Hastings Beer & Music Festival` in 2012.
 |
| `Keane` - `HBMF` 2012 - Douglas Benge |
Photographing a Concert: The Basics
If I've learnt anything from my previous work photographing
concerts, it’s that you have to work with what you have, in terms of the stage
setup, and more importantly, the lighting rig that is being used to light the
stage. Here are a few basic points that will help you to take better concert
photographs:
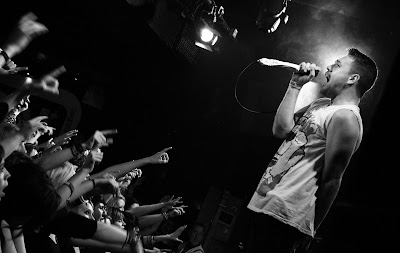
- Backlight your subjects - This is such a simple but
effective technique. Photograph your subjects when they appear in front of a
light, or if you should be in the `photographer pit` area, move yourself, so
that your subject is positioned with a predominant light behind them; this
creates a perfect halo around them and adds a great level of contrast to any image. You
can see some examples of this `backlighting` technique within my photographs
below.
- Try to avoid
using flash, or use it wisely - When using flash to photograph live
performances, it will quite often remove any shadow and depth that can be found
within your image. I always try and work with the lighting rig that is being
used, to capture the natural atmosphere surrounding the subject.
- Use a fast
lens - By this I mean use a lens that has a very large aperture, anywhere
between f/1.4 and f/2.8 would be perfect. The benefit of this is that you can
use a faster shutter speed compared to a lens with a smaller aperture; as more
light is allowed in through the lens, the shutter speed can therefore become
faster, allowing you to take sharper images. If I’m working as a photographer
at quite a large venue, I would tend to use my Canon 50mm f/1.8 Mk II prime
lens, as this works unbelievably well in low light conditions, due to its large
aperture size.
- Go full manual! - I know it may seem a bit daunting at first if you
haven’t used the `M` mode, (manual mode), on you Digital SLR before, but trust
me, to get great shots that have a fantastic level of contrast, depth, and have
a sharp focus, manual mode is the ideal setting. If you use a pre-set mode on
your camera, your photographs will tend to be over exposed and blurred, as your
camera is trying to get as much light in through the lens as possible, and
therefore uses a longer shutter speed to help it achieve this, which results in
blurred images. Manual focus is so important as well, as your camera may find
it very difficult to keep the focus on moving subjects, especially in the low
light conditions of a concert. Before the band I'm photographing come on, I’ll
take quite a few test shots to find the right shutter speed and aperture size
to get the perfect exposure level.
- Choose the
right ISO - Setting the ISO of your camera to the correct level will make all
the difference when taking your photographs. If you’re not familiar with ISO,
it measures the sensitivity of your camera's sensor. This basically means that
the lower the ISO is, e.g. 100 ISO, the less sensitive your camera's sensor is
to light. The higher the ISO is, e.g. 3200 ISO, the more sensitive your sensor
is to light. But this increase in sensitivity does increase the amount of grain
and noise that can be found within an image, so it is important to get the ISO
just right, and not set it too high. At concerts I often photograph my subjects
at around 800 ISO, as I have found that this is generally the right level to
produce images that are sharp and not grainy.
- Choose
different angles - A photographer should never be stationary, unless you’re
using a tripod of course! Move around as much as you can to get coverage from
many different angles; this will allow you to produce varied photographs which
are much more interesting. Don’t be afraid to tilt and angle your camera as
well. I hardly ever have my camera solely in the landscape or portrait
position, I'm always trying to find an angle that enhances the composition of
my shot, which therefore creates a more dramatic photograph.
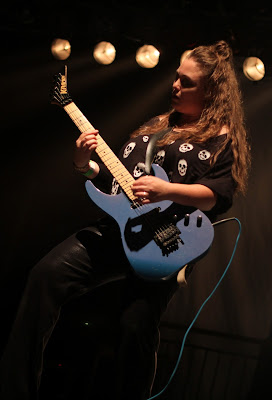
Here are some
photographs that I took at `Hastings Beer & Music Festival` (HBMF) in 2012
featuring `Keane`, `Cushty`, and `Ska’d 4 Life`. These photographs were taken on my Canon EOS 500D with the Canon 50mm f/1.8 Mk II lens. I have also included some photographs that I took of `The Blackout` performing at `The Old Fire Station` in Bournemouth. These
photographs were taken on my Canon EOS 550D with the Canon 18-55mm f/3.5-5.6 IS lens:
Click on the
images to enlarge them.
 |
| `Gavin Butler` - `The Blackout` - Douglas Benge |
 |
| `SPIN` - `HBMF` 2012 - Douglas Benge |
 |
| `Tom Chaplin` - `Keane` - `HBMF` 2012 - Douglas Benge |
 |
| `Cushty` - `HBMF` 2012 - Douglas Benge |
 |
| `Sean Smith` - `The Blackout` - Douglas Benge |
 |
| `Ska'd 4 Life` - `HBMF` 2012 - Douglas Benge |
 |
| `Tom Chaplin` - `Keane` - `HBMF` 2012 - Douglas Benge (2) |
.JPG) |
| `Sean Smith` - `The Blackout` - Douglas Benge (2) |
Top Tip:
`Use your
time wisely. If you’re working as a photographer at a venue where a band are
playing, the band will state beforehand how many songs the photographers are
allowed to take photos for. From past experience, most bands tend to allow
photos to be taken for the first three songs. That may seem like a lot of time,
but trust me, it will fly by! You need to keep taking photos and try all the
different camera angles you can; this will ensure that you have a good variety of
images to choose from when you select your photographs to edit.`


.JPG)